带你做一个基于智能合约的项目
以太坊
![]()
以太坊(英语:Ethereum)是一个开源的有智能合约功能的公共区块链平台。通过其专用加密货币以太币(Ether,又称“以太币”)提供去中心化的虚拟机(称为“以太虚拟机”Ethereum Virtual Machine)来处理点对点合约。
从前年开始比特币这种去中心化的代币火了起来,但一直没有实际的基于区块链应用开发出发更多的就是挖矿炒币,直到以太坊的出现,智能合约的出现。大大方便了基于区块链项目的开发。
智能合约(英语:Smart contract )是一种旨在以信息化方式传播、验证或执行合同的计算机协议。智能合约允许在没有第三方的情况下进行可信交易。这些交易可追踪且不可逆转。
但目前相对的游戏还是比较单一40%的市场都是基于击鼓传花类的游戏(代表作加密名人),30%是基于收藏类的游戏(代表作加密猫)。更多的感觉还是借助区块链的这热度来快速圈钱。
当然也不可否定对于这个新鲜事务或玩法也有颠覆的一面,智能合约一但发布全部合约代码,会放到区块链上所有人可以查看。比如加密猫的源码在区块链上就是可查的包括所有的代码注释,官方无法在再像传统游戏隐瞒各种概率类事件。当然如果发生盗号一类事件官方也无法进行回档操作。
我们可以看到加密猫的部分常量代码写死到了智能合约里,比如0代猫的最大数量,用户促销活动的0代猫数量。
  contract KittyMinting is KittyAuction {

      // Limits the number of cats the contract owner can ever create.
      uint256 public constant PROMO_CREATION_LIMIT = 5000;
      uint256 public constant GEN0_CREATION_LIMIT = 45000;
介绍了很多,到底这些分布式APP的未来如何不可知,但我们今天的主要目的是分享一下技术,实现一个基于智能合约的投票项目。 本文档会以macOS版本来举例构建开发环境.
客户端
以太坊的主要客户端是Geth由GO语言开发,开发使用Solidity。我们今天全部使用brew来自动安装
Geth终端的安装
Geth一个基于GO语言开发的以太网终端,可以执行终端命令。创建私有网络,挖矿。 官方地址
macOS下的安装
brew tap ethereum/ethereum
brew install ethereum
#连入公有以太网
geth consle
#连入私有网络
geth attach http://localhost:7545 consle
Ganache 安装
基于私有链路的一个服务器程序,有图形界面可用很方便,下载安装即可使用。 (代替旧有的testrpc) 下载地址

智能合约
智能合约的开发语言是Solity.我们还会使用Truffle框架方便进行dApp快速开发测试。
SolityIDE安装
IDE目前没有太智能的,在线的推荐Remix可以直接编译程序生成字节码,并进行发布。单机模式推荐Atom,并安装相应的智能提示插件。
Solidity,truffle安装
Solidity是一种合约导向式语言,可被应用于各种不同的区块链平台上,其主要开发者为Gavin Wood,Christian Reitwiessner,Alex Beregszaszi,Liana Husikyan,Yoichi Hirai和其他几位早期以太坊核心贡献者。Solidity 可使程式开发人员能在区块链上(例如以太坊)编写智能合约。
关于Solidity的官方文档 在这里语法比较简单,像javascript很快就可以上手。(官方文档有语言可选 en zh 我选了ZH后翻了好几页也没简单一个简体中文)
brew update
brew upgrade
brew tap ethereum/ethereum
brew install solidity
brew linkapps solidity

npm install -g truffle
创建我们的投票项目
网上很多旧的教程还在用truffle init在初始化,这是官方已经抛弃的旧方法。目前官方推荐使用
Truffle Boxes 来创建项目。是官方已经做好的一些模板项目,方便我们的快速开发.
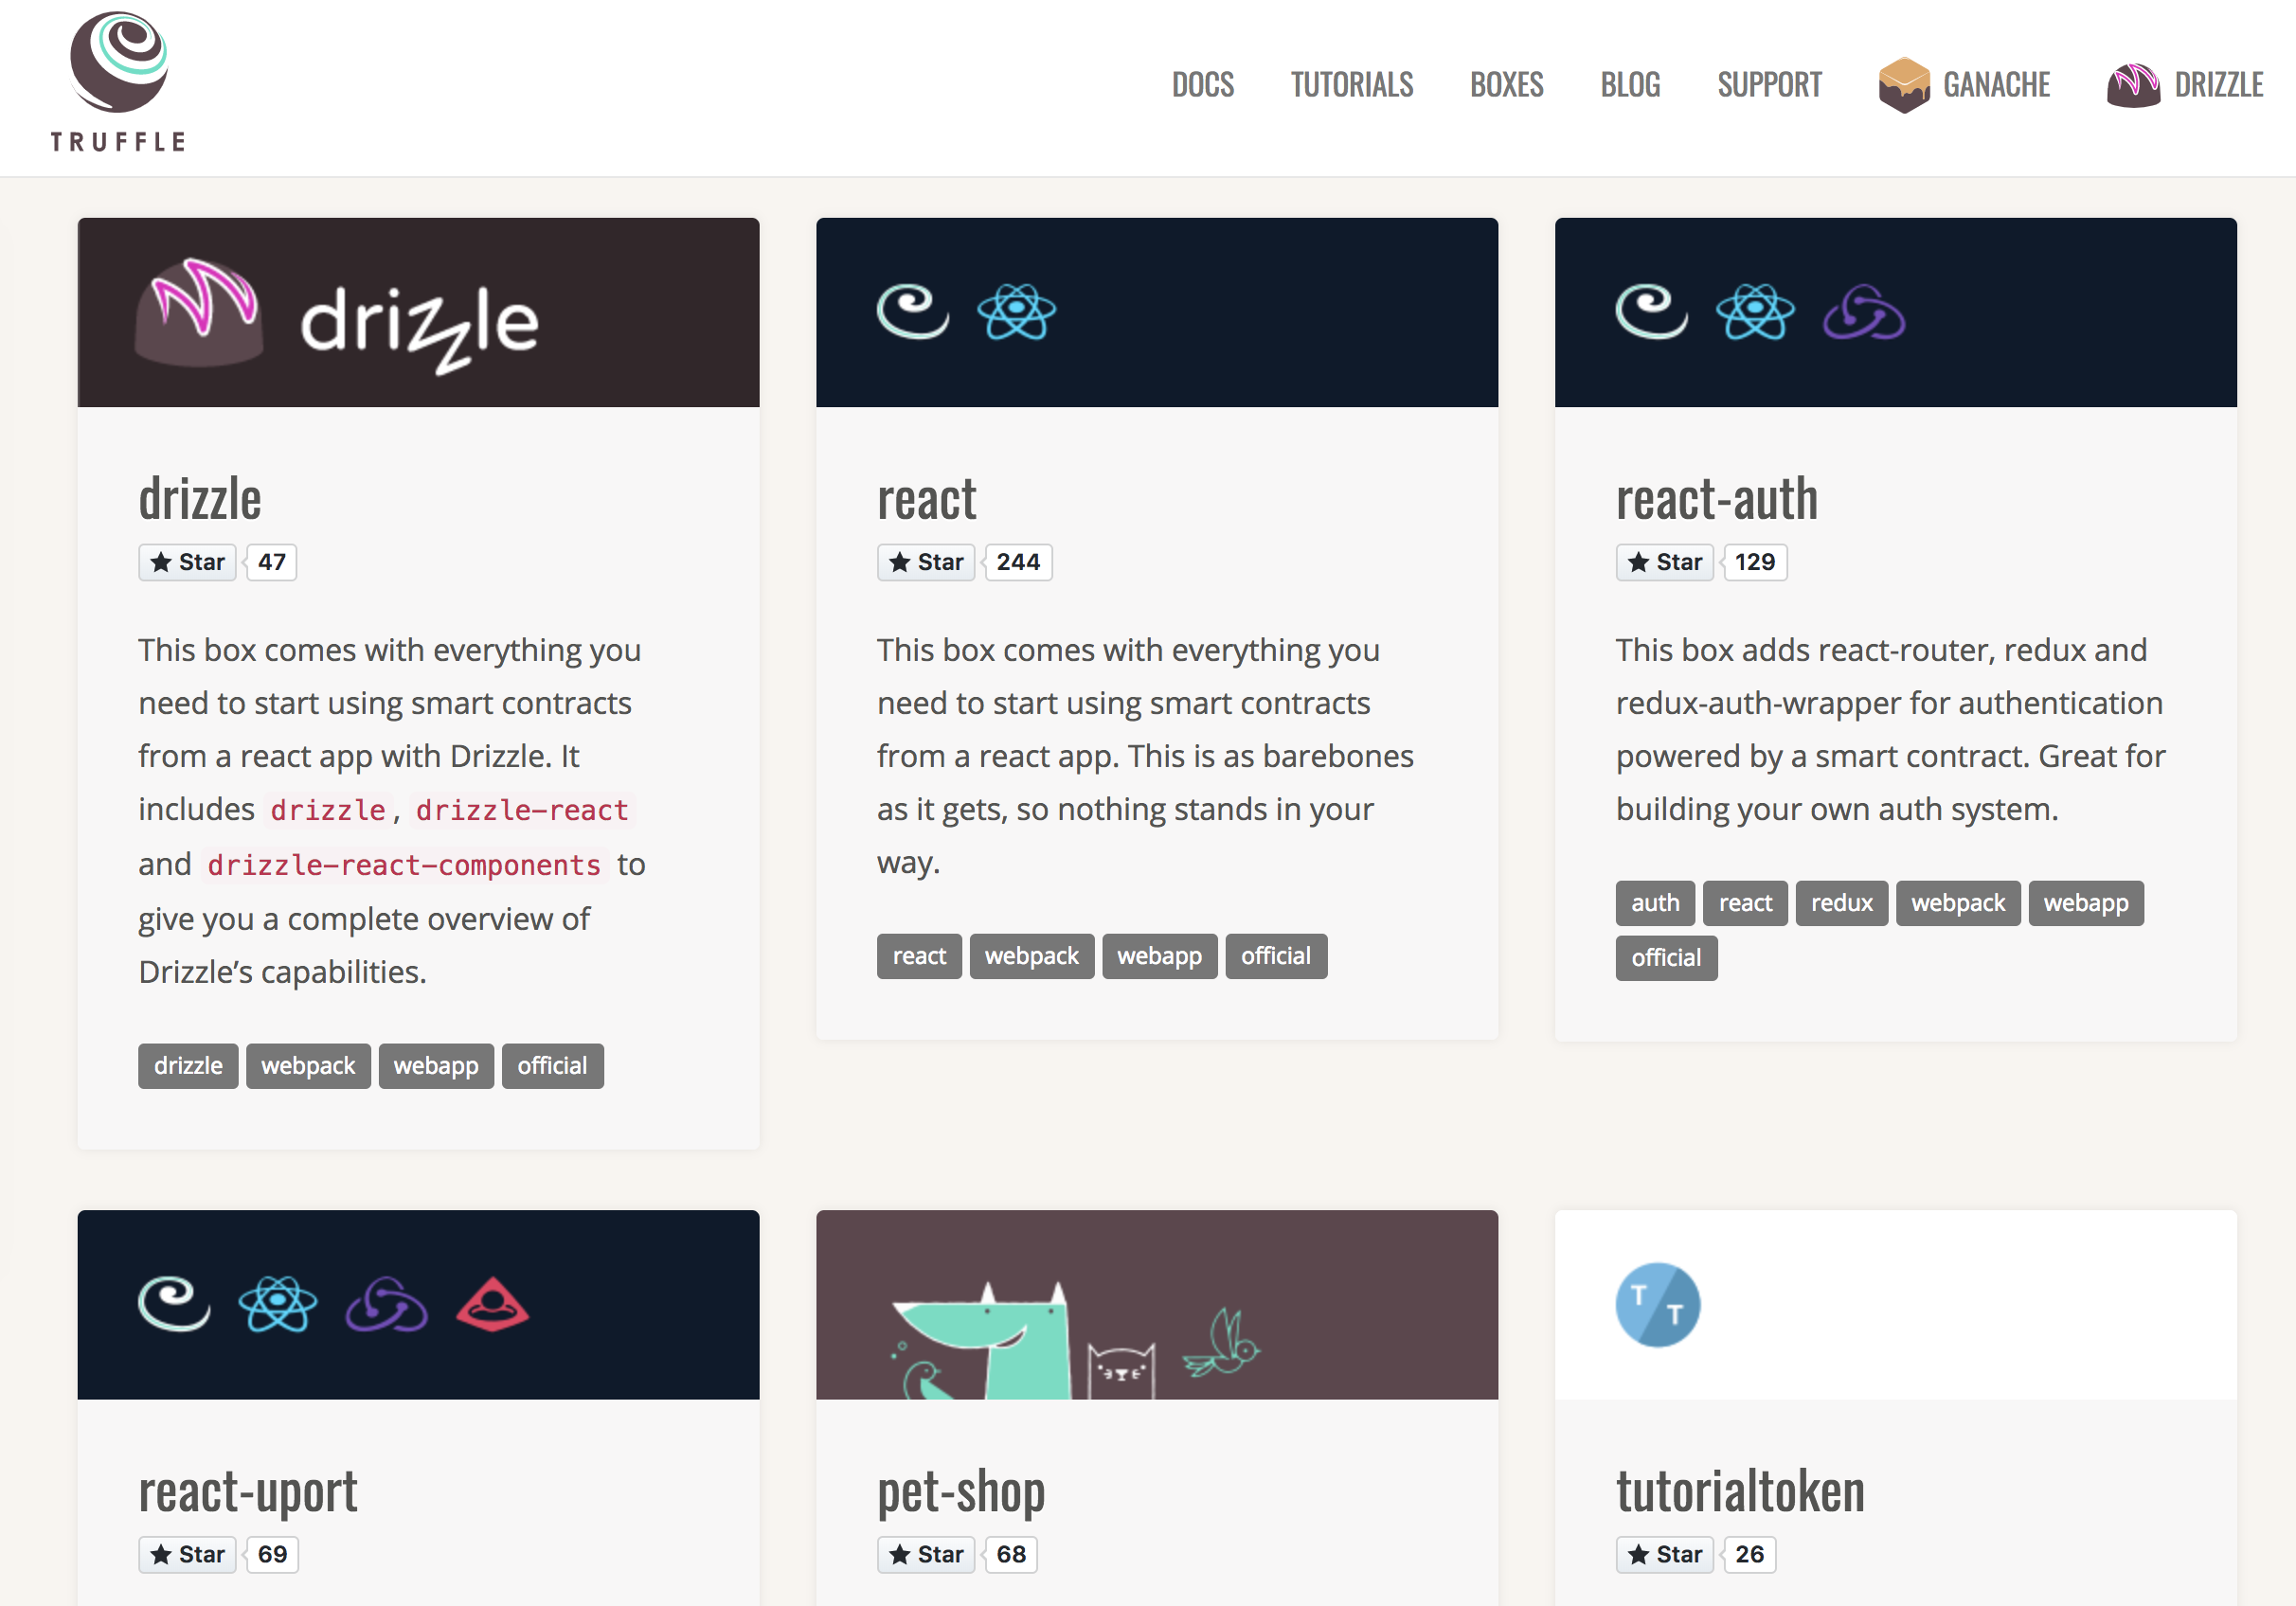
guohai•Developer/ethereum/vote» truffle unbox react
Downloading...
Unpacking...
Setting up...
Unbox successful. Sweet!

Commands:

  Compile:              truffle compile
  Migrate:              truffle migrate
  Test contracts:       truffle test
  Test dapp:            npm test
  Run dev server:       npm run start
  Build for production: npm run build
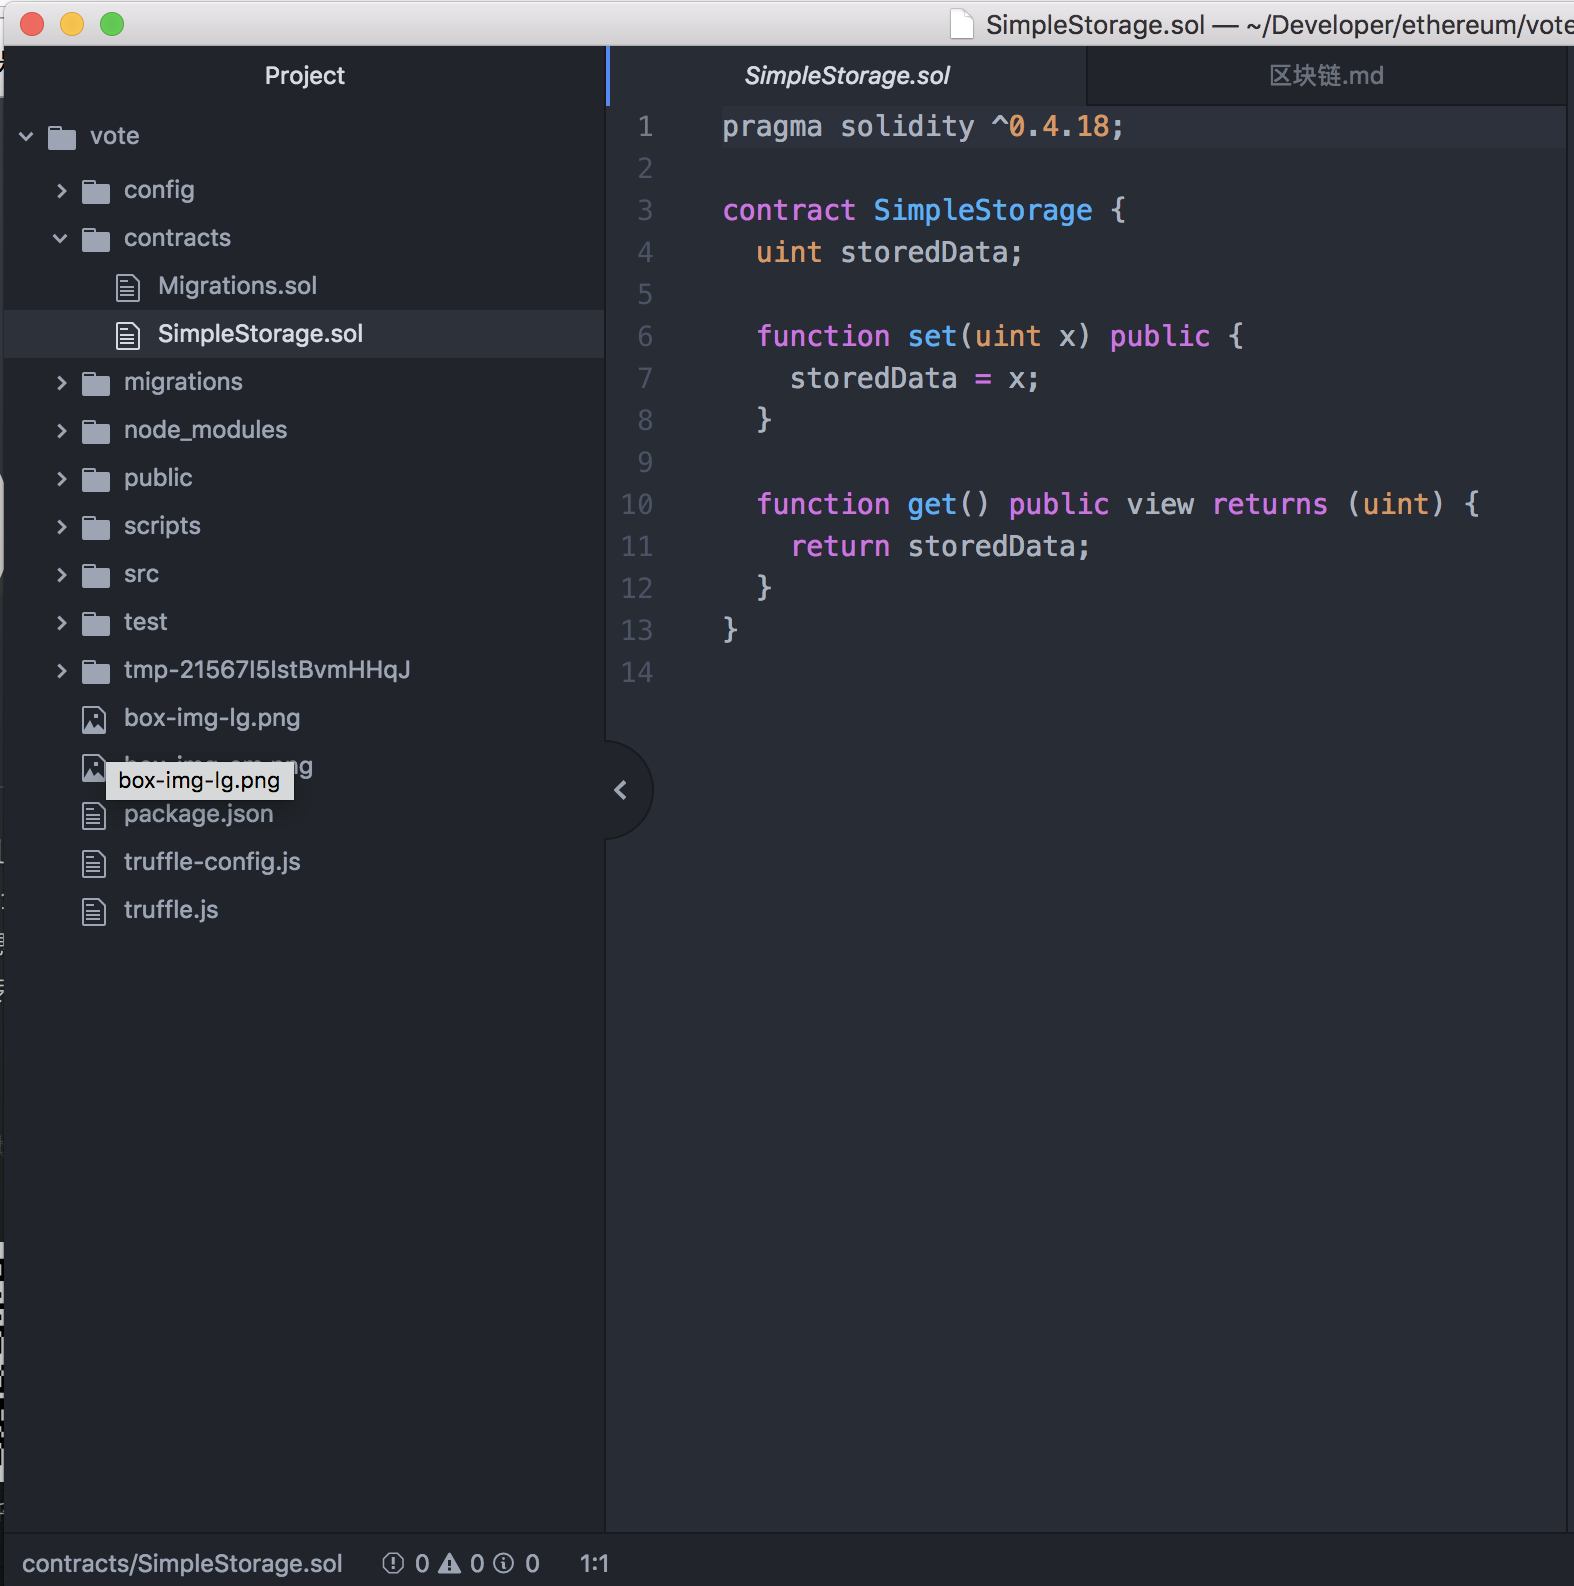 执行完上面的命令会帮我们创建一个项目目录。
- contracts:编写智能合约的文件夹,所有的智能合约文件都放置在这里
- migrations:部署合约配置的文件夹
- src:基于React的Web端源码
- test:智能合约测试用例文件夹
创建投票合约
我们先在contracts目录下创建一个Voting.sol 来写我们的合约内容
pragma solidity ^0.4.18;

contract Voting {
    mapping (bytes32 => uint8) public votesReceived;
    //候选人
    bytes32[] public candidateList;

    //无名函数 ,构造方法
    function Voting(bytes32[] candidateNames) public {
      candidateList = candidateNames;
    }

    //查票
    function totalVotesFor(bytes32 candidate) public constant returns (uint8) {
      require(validCandidate(candidate) == true);
      return votesReceived[candidate];
    }

    //投票
    function voteForCandidate(bytes32 candidate) public {
      assert(validCandidate(candidate) == true);
      votesReceived[candidate] += 1;
    }

    //select
    function validCandidate(bytes32 candidate) public constant returns (bool) {
      for(uint i =0 ; i < candidateList.length; i++) {
        if(candidateList[i] == candidate) {
          return true;
        }
      }
      return false;
    }
}
发布合约到我们的私有链上
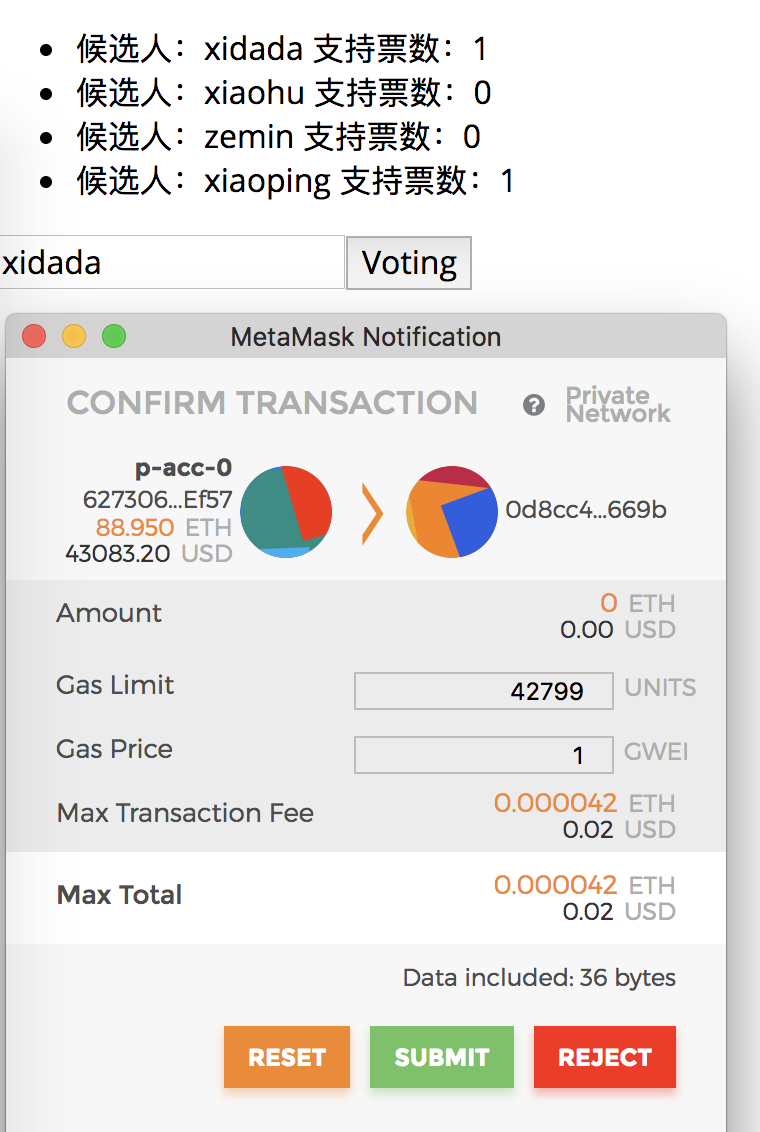
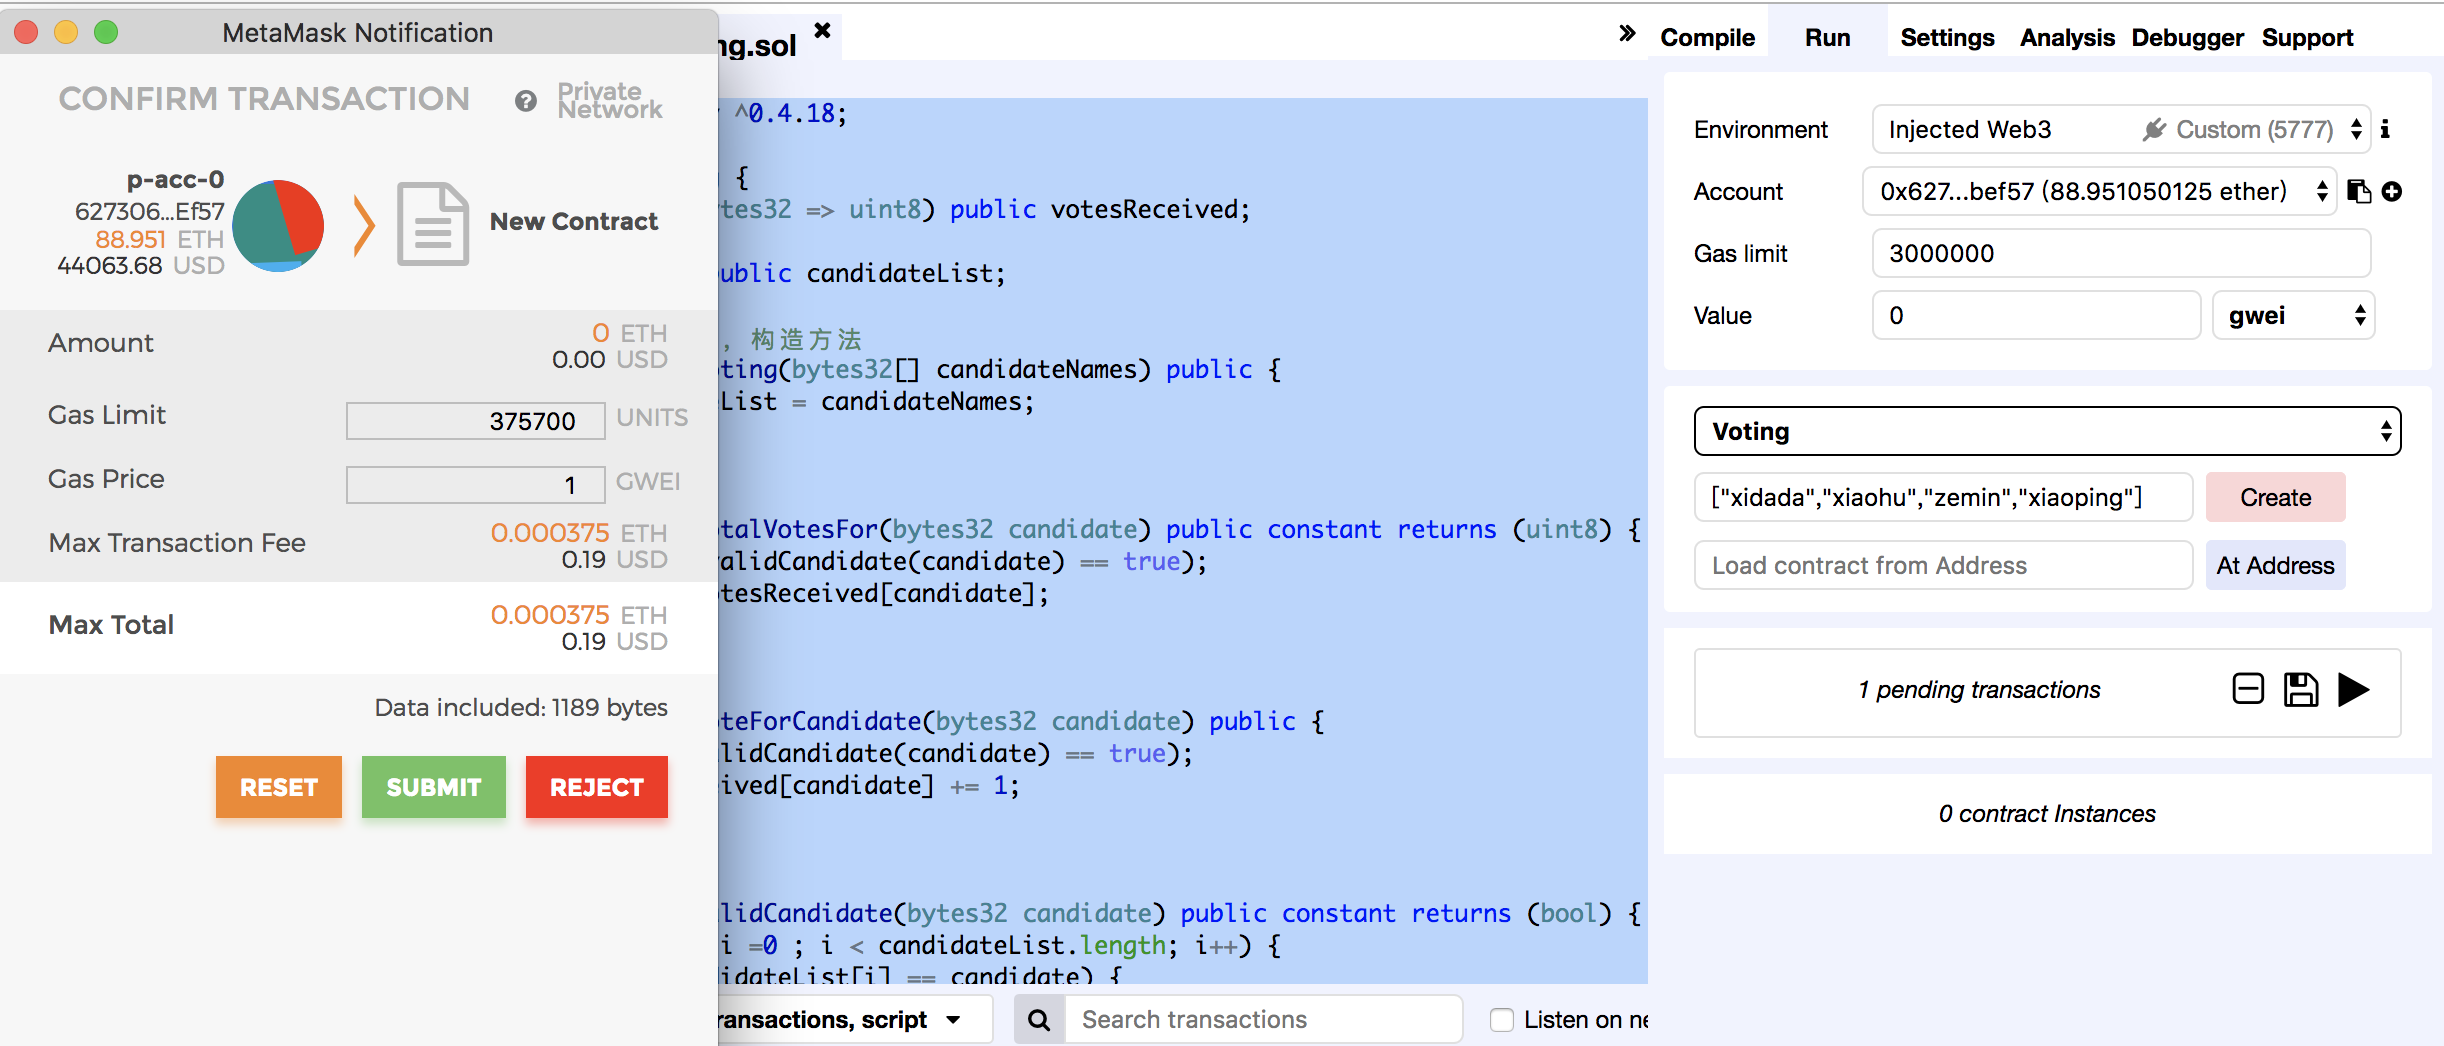 在以太网的区块链上发布合约也是要消耗GAS的,为矿工支付报酬。我们需要先安装chrome的一个钱包插件MetaMask.安装好后切换下钱包的网络到你的私有链上。打开Remix我们在进行合约的发布。提交后我会得到合约的地址,拷贝下来 “0x0d8cc4b8d15d4c3ef1d70af0071376fb26b5669b”
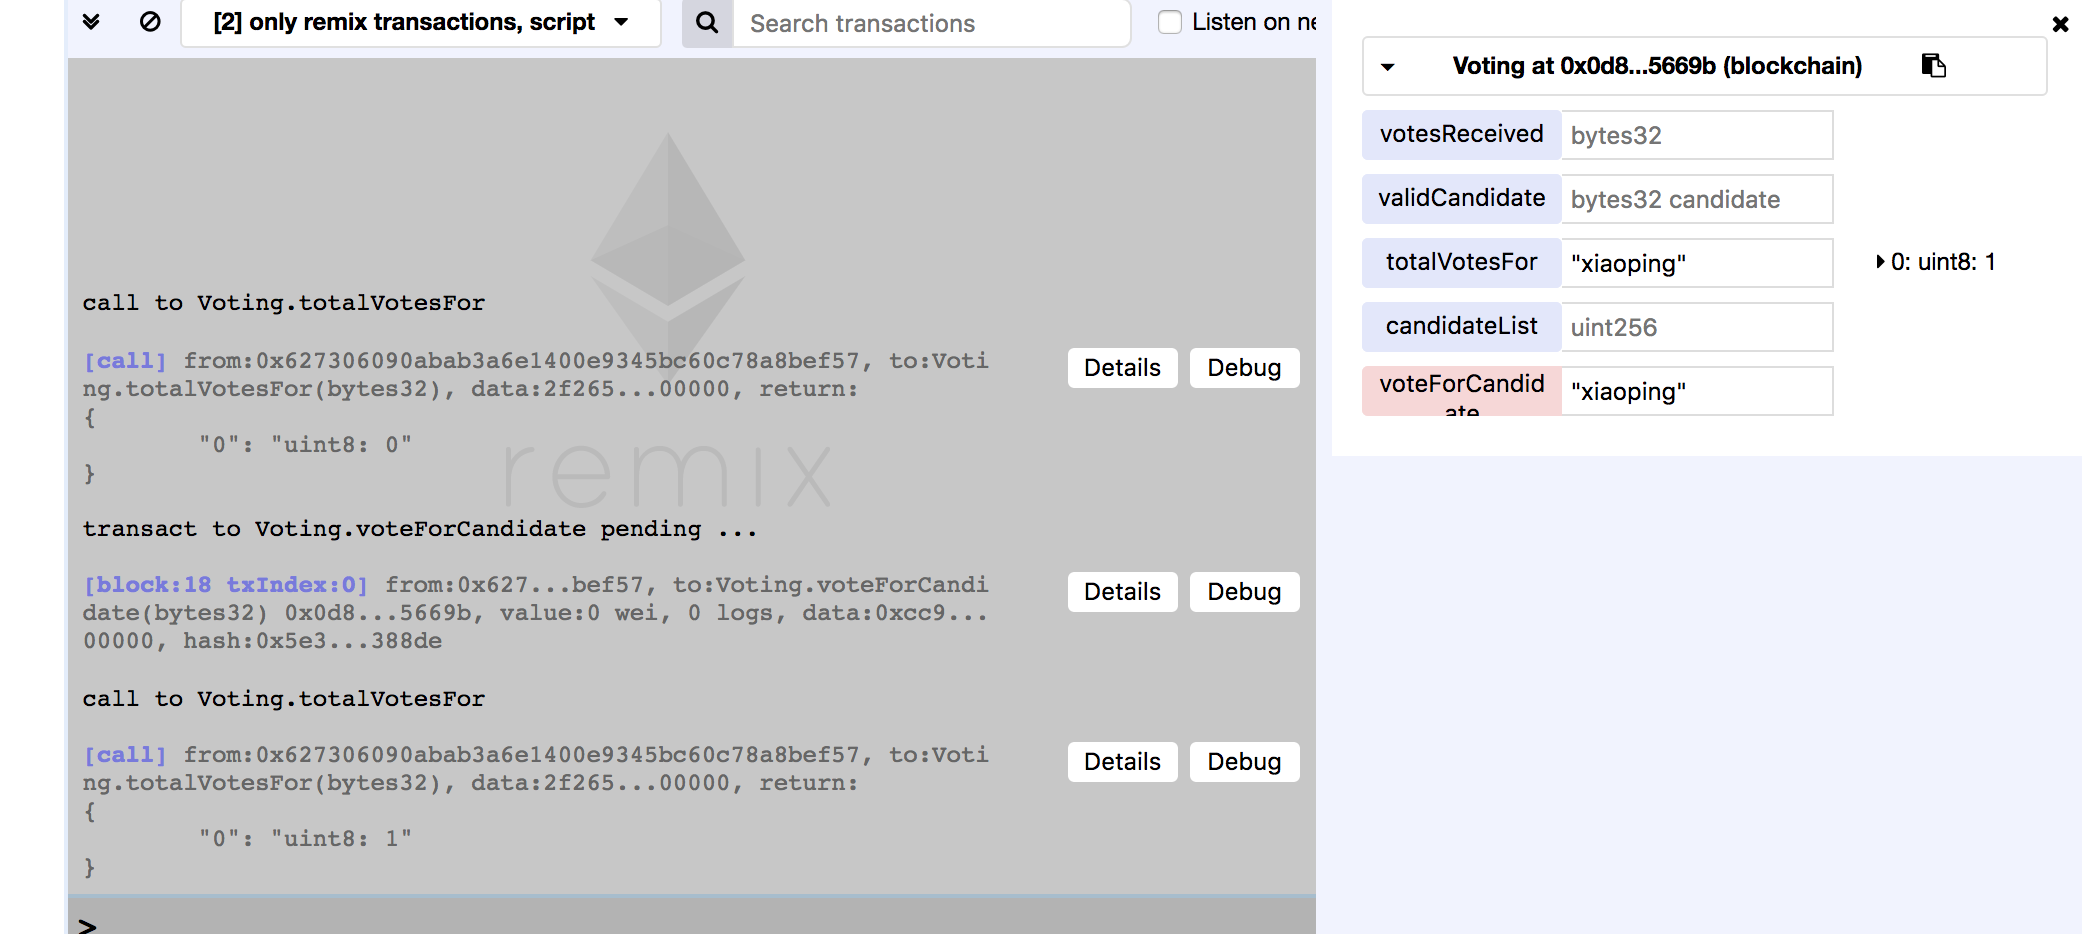 当 合约发布完后,我们可以直接在Remix里对合约的方法进行调用测试。当测试无问题后我们再开发APP程序。在测试程序的时候我们可以看到粉红色的投票方法按钮因为要写数据到区块中是要消耗GAS的。而我们的查询按钮全是蓝色,因为不用写入全是免费的。
友好的网页界面程序
接下来编译我们的项目,得到ABI。truffle compile .修改src/App.js文件为如下内容
import React, { Component } from 'react'
import VotingContract from '../build/contracts/Voting.json'
import getWeb3 from './utils/getWeb3'

import './css/oswald.css'
import './css/open-sans.css'
import './css/pure-min.css'
import './App.css'

const contractAddress ="0x0d8cc4b8d15d4c3ef1d70af0071376fb26b5669b"
var votingContractInstance;
var account;

var _modifyVotingCount = (candidates,i,votingCount) => {

    console.log("---------");
    console.log(candidates);
    console.log(i);
    console.log(votingCount);

    let obj = candidates[i];
    obj.votingCount = votingCount;
    return candidates;
}

class App extends Component {
  constructor(props) {
    super(props)

    this.state = {
      candidates: [
                    {
                      "name": "xidada",
                      "id": 100,
                      "votingCount": 0
                    },
                    {
                      "name": "xiaohu",
                      "id": 101,
                      "votingCount": 0
                    },
                    {
                      "name": "zemin",
                      "id": 102,
                      "votingCount": 0
                    },
                    {
                      "name": "xiaoping",
                      "id": 103,
                      "votingCount": 0
                    }
                  ],
      candidatesVoteCount: ["0","0","0","0"],
      web3: null
    }
  }

  componentWillMount() {
    // Get network provider and web3 instance.
    // See utils/getWeb3 for more info.

    getWeb3
    .then(results => {
      this.setState({
        web3: results.web3
      })

      // Instantiate contract once web3 provided.
      this.instantiateContract()
    })
    .catch(() => {
      console.log('Error finding web3.')
    })
  }

  instantiateContract() {
    /*
     * SMART CONTRACT EXAMPLE
     *
     * Normally these functions would be called in the context of a
     * state management library, but for convenience I've placed them here.
     */

    const contract = require('truffle-contract')
    const votingContract = contract(VotingContract)
    votingContract.setProvider(this.state.web3.currentProvider)

    // Declaring this for later so we can chain functions on SimpleStorage.


     // Get accounts.
     this.state.web3.eth.getAccounts((error, accounts) => {
       votingContract.at(contractAddress).then((instance) => {
         account = accounts[0];
         votingContractInstance = instance;
         for (let i = 0; i < this.state.candidates.length; i++) {
             let object = this.state.candidates[i];
             console.log(accounts[0]);
             console.log(votingContractInstance);
             console.log(votingContractInstance.totalVotesFor(object.name));
             votingContractInstance.totalVotesFor(object.name).then(result => {
               console.log(i);
               console.log(result.c[0]);
               this.setState({
                 candidates: _modifyVotingCount(this.state.candidates,i,result.c[0])
               });
             });
         }
       })
     })


  }

  render() {
    return (
      <div className="App">
      <ul>
        {
         this.state.candidates.map((object) => {
           console.log(object);
           return (

                <li key={object.id}>候选人:{object.name}          支持票数:{object.votingCount}</li>
            )
         })
        }
      </ul>

      <input
            placeholder="请输入候选人姓名..."
            ref="candidateInput"
      />
      <button onClick={() => {
        console.log(this.refs.candidateInput);
        console.log(this.refs.candidateInput.value);
        let candidateName = this.refs.candidateInput.value;
        console.log(this.state.web3.eth.accounts[0]);
        votingContractInstance.voteForCandidate(candidateName,{from:account}).then((result => {
          console.log(result);
          console.log(candidateName);
          let number = 0;
          for(let i = 0; i < this.state.candidates.length; i++) {
            let object = this.state.candidates[i];
            if (object.name === candidateName) {
              number = i;
              break;
            }
          }
          votingContractInstance.totalVotesFor(candidateName).then(result => {

            this.setState({
              candidates: _modifyVotingCount(this.state.candidates,number,result.c[0])
            });
          });

        }));
      }}>Voting</button>

      </div>
    );
  }

}

export default App
接下来运行我们的项目 npm run start
参考资料
如果觉得文章内容比较实用,期望获得更新通知,请关注公众号: